vrijdag 16 juli 2010

Hoe kan ik in Windows 7 de actie van de afsluitknop wijzigen?

In het Menu Start vindt je standaard direct een knop waarmee de computer is uit te schakelen. Door op het kleine pijltje rechts van de knop te klikken krijg je de overige opties te zien zoals Opnieuw opstarten, Slaapstand, Vergrendelen en Afmelden. Deze grote knop die je ziet in het Menu Start kan gewijzigd worden en hier kun je bijvoorbeeld bepalen dat na een klik op de knop de Computer vergrendeld in plaats van afsluit.
Om dit in te stellen, klik ergens met de rechtermuisknop in een leeg gedeelte op de taakbalk en klik dan op Eigenschappen. Klik in het venster dat opent op het tabblad "Menu Start". Direct bovenaan kun je dan de gewenste actie instellen. Actie afsluitknop wijzigen
Bron: WebSonic

Hoe kan ik in Windows 7 het Messenger opstartscerm uitschakelen?

Robbin Ooijevaar 08 jul. 2010 07:56
Bron: Computer!Totaal
 
Vraag van een lezer: Ik heb Windows 7 op mijn computer geïnstalleerd en krijg bij het opstarten het hinderlijke Messenger-scherm te zien. Ik heb van alles geprobeerd om het weg te krijgen, maar niets lukt. Wel heb ik op internet iets gevonden over het bestand sysoc.inf. Heeft dat er iets mee te maken?
Ons antwoord: Waarschijnlijk was uw Windows Live Messenger in Windows XP al geconfigureerd. U kunt de opstartopties in Messenger gemakkelijk aanpassen. Open Windows Live Messenger, druk op de Alt-toets en kies voor Extra / Opties. Ga naar het venster Aanmelden en schakel de optie Hoofdvenster van Windows Live Messenger openen bij het starten van Messenger uit. Eventueel kunt u de optie Windows Live Messenger starten bij het aanmelden bij Windows uitschakelen: zo wordt Messenger bij het inloggen helemaal niet gestart. Het reclamevenster schakelt u uit door Windows Live Today weergeven na het aanmelden bij Windows Live Messenger uit te schakelen.

Hoe kan ik in Windows 7 onderdelen van de gebruikersomgeving vergrendelen of uitschakelen?

Bron: Computer!Totaal
Dennis Gandasoebrata28 jun. 2010 11:12
Taakbalk opties aanpassen
U kunt verschillende onderdelen van de gebruikersomgeving vergrendelen of zelfs uitschakelen, als u niet wilt dat ze worden aangepast. Wilt u niet dat de positie en grootte van de Windows-taakbalk worden aangepast?
In het Windows-register (Start, Uitvoeren en typ Regedit) gaat u naar de sleutelHKEY_CURRENT_USER\Software\Microsoft\ Windows\CurrentVersion\Explorer\Advanced en hier kiest u Bewerken, Nieuw, DWORD-waarde. Deze noemt u TaskbarSizeMove. Dubbelklik erop en typ een 0 in het vak Waardegegevens, waarna u op OK klikt. U kunt ook het rechtsklikken op de Windows-taakbalk uitschakelen, zodat u voorkomt dat het contextmenu met aanvullende opties verschijnt. Dit doet u in de registersleutelHKEY_LOCAL_MACHINE\Software\Microsoft\Windows\CurrentVersion\Policies\Explorer. Kies Bewerken, Nieuw, DWORD-waarde en noem deze NoTrayContextMenu. Dubbelklik erop, typ een 1 in het vak Waardegegevens en klik op OK. Ook kunt u het menu Start ‘bevriezen’, zodat medegebruikers er geen veranderingen in aan kunnen brengen. Blader naar de sleutelHKEY_CURRENT_USER\Software\Microsoft\Windows\CurrentVersion\Policies\Exploreren kies NoChangeStartMenu. Klik erop met rechts en kies Wijzigen. In het vakWaardegegevens typt u een 1, waarna u op OK klikt. Alle aanpassingen doorgevoerd? Klik Bestand, Afsluiten om het register te verlaten. Start Windows nu opnieuw op.

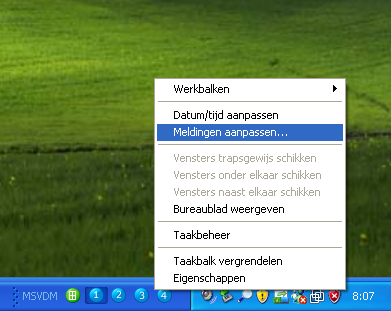
Het menu van de rechtermuisknop kan achter slot en grendel worden gezet.
Zoek functie vergrendelen
Er kunnen nog meer onderdelen worden vergrendeld, zoals de functie Zoeken in de werkbalk van Windows. Blader naar de sleutelHKEY_CURRENT_USER\Software\Microsoft\Windows\CurrentVersion\Policies\ Explorer. Kies Bewerken, Nieuw, DWORD-waarde en noem dezeNoShellSearchButton. Dubbelklik erop en geef een 1 op bij Waardegegevens. We gaan nog even verder, want ook de submappen rechts bovenin het menu Start kunt u verbergen, en wel via dezelfde sleutelHKEY_LOCAL_MACHINE\Software\Microsoft\Windows\CurrentVersion\Policies\
Explorer. Kies Bewerken, Nieuw, DWORD-waarde en noem dezeNoStartMenuSubFolders. Dubbelklik erop en geef een 1 op in het vakWaardegegevens. Klik op OK en kies Bestand, Afsluiten.

Hoe kan ik in Windows 7 mijn sociale netwerken automatiseren?


Dlvr.it (beta) is een dienst vergelijkbaar met het bekende Twitterfeed om automatisch berichten van bijvoorbeeld een blog te plaatsen op Twitter, Facebook, Google Buzz, LinkedIn, Tumblr en Ping.fm. Hierbij heb je de keus om alleen de titel of ook een korte omschrijving mee te sturen. Dlvr.it heeft nu Analytics beschikbaar gemaakt om geplaatste links op bijvoorbeeld Twitter te kunnen voorzien van UTM tagszoals dit ook kan met Twitterfeed. Naast Analytics is ook Omniture beschikbaar gemaakt.
De mogelijkheid is te vinden door op de knop 'options' te klikken onder een bestaande koppeling en te gaan naar het tabblad 'Tracking'.
Onlangs was er overigens nog een andere update voor Dlvr.it, een search and replace functie. Hiermee is het mogelijk om woorden in items van een RSS feed te vervangen of te verwijderen voordat een bericht wordt geplaatst.

Bron: WebSonic

Mount SkyDrive, S3, Google Docs, and Other Cloud Storage in Explorer


Source: How-to Geek
    Online file storage services such as SkyDrive and Amazon S3 are becoming increasingly popular, and many of us additionally save documents and other files online daily with webapps like Google Apps.  Here’s how you can integrate these storage services with your Windows PC and access them just like your normal hard drive and flash drives.
Cloud computing promises to make file organization simpler, since you can save your files online and access them from anywhere.  However, often the web interfaces are slow and difficult to use, which makes it hard to keep all of your files online.  Gladinet is a free tool for Windows that lets you access many different online storage services directly in Windows Explorer.  It mounts these accounts as networked storage devices, and lets you save, move, and rename files just as you would on your standard hard drive.  Here’s an overview of how you can use Gladinet with the services you use to keep all of your data organized the way that works best for you.
Getting Started
Download the free Gladinet Starter edition (link below) and install as normal.  Note that both 32-bit and 64-bit editions are available, so choose the correct one for your system.
sshot-2010-06-23-[14-09-29]
During the install you’ll be given the option to customize Gladinet.  We recommend leaving the Start WebClient service and Register Gladinet Cloud Desktop to Windows Firewallboxes checked, as these will ensure that Gladinet works as its supposed to.
sshot-2010-06-23-[14-09-50]
Once its installed, you’ll need to do some preliminary setup.  Select the bullet at the top to continue using the free starter edition, and click Next.
sshot-2010-06-23-[14-11-36]
You can enter your email address if you wish to receive updates; otherwise, just click Nextto continue.
sshot-2010-06-23-[14-11-44]
Gladinet offers a wide variety of online storage accounts that you can add.  We’re adding Windows Live SkyDrive in this example, but feel free to select any online storage accounts you have that you’d like to integrate with Windows Explorer.  Click Next again to continue.
sshot-2010-06-23-[14-12-04]
Finally, confirm your settings, and edit if anything is incorrect.  Click Finish when you’re done.
sshot-2010-06-23-[14-12-17]
Mount SkyDrive in Windows Explorer
Microsoft offers 25Gb of free online storage with their Windows Live SkyDrive service, but unfortunately, they don’t offer a way to integrate this storage directly into Windows.  Gladinet, however, lets us mount SkyDrive as a local network drive, so you can open your online files and folders directly from Explorer, or drag-and-drop new files directly into your SkyDrive. 
If you chose SkyDrive in the initial setup box as above, you’ll be all set to start using your 25Gb of free online storage in Windows.  Open Computer and select the new Z: drive.  Double-click the SkyDrive link to get started.
sshot-2010-06-23-[14-14-35]
Enter your Windows Live ID and password in the dialog, and click Next.
sshot-2010-06-23-[14-14-55]
Click Finish to get your SkyDrive account linked to your computer.
sshot-2010-06-23-[14-15-10]
A popup will open making sure you want to load the SkyDrive plugin.  Click Yes to accept and continue.
sshot-2010-06-23-[14-15-22]
Gladinet will now mount SkyDrive in your new virtual Z: drive.  This may take several minutes, depending on your internet connection speed.
sshot-2010-06-23-[14-15-34]
You may see a popup offering to setup automatic backup to your cloud storage.  This is a professional feature, so if you wish to just use the free version click Cancel to continue.
sshot-2010-06-23-[14-16-14]
Using SkyDrive Directly In Windows Explorer
After a few minutes, an Explorer window will open and display the contents of your SkyDrive directly in Windows Explorer.  Now you can browse the contents of your SkyDrive directly from Explorer!  You can even use native Windows features such as breadcrumb folder selection.
image
You can access more functions from the right-click menu.  In addition to the standard file and folder operations such as rename, copy, and delete, you can also choose Glaidnet-specific features.  These let you get the URL for a web folder, or simply open the folder directly in your browser.  Note that Explorer may appear to freeze while it is accessing your online storage; using online storage can be slow, especially if your internet connection is slow.
image
And you can quickly access your online storage directly from the Computer view in Explorer.  Note that the amount of storage reported available was strangely just copying our C: drive’s storage; your SkyDrive only contains 25Gb of storage space.
image
You can add new files by dragging and dropping them into folders in SkyDrive.  This will open a small popup from Gladinet showing the upload progress.  Adding new files may take some time, depending on your internet connection.  If you’d rather not see the popups every time, check the box at the bottom of the dialog.
sshot-2010-06-23-[14-35-26]
Additionally, if you’re uploading or downloading large files or a large number of files at once, Gladinet will warn you that the process may take a long time.  If you’d like to backup a large number of files to or from your online storage, you may want to let your computer upload during the night or some other time when it would otherwise be idle.
sshot-2010-06-23-[14-31-47]
You can also select your online SkyDrive storage as the location to save new files from any program.
image
You can open any of your files directly from your SkyDrive by simply double-clicking them as normal.  Again, they may take a few moments to open as they must download first.  If you open a Microsoft Office file from your SkyDrive in Office 2010, it will recognize that the file is stored online at SkyDrive and will take advantage of the versioning support in the Office Web Apps.  Your Save button will change to show that it is refreshing the changes with the copy saved on the cloud.
image
Do note that SkyDrive only allows you to store files that are up to 50Mb large.  If you try to upload a larger file, Gladinet will offer to split the file in smaller pieces for you; however, this is a professional feature, so if you’re using the free version just click No and upload a different file or split the file in pieces yourself.
image
Additional, sycronization tools such as SyncToy did not seem to work with online storage accounts in Gladinet.  So if you want to backup files to your online storage, you’ll need to either purchase the professional version of Gladinet which includes a backup utility or simply drag-and-drop the files manually.
SNAGHTMLf64d48
Add Another Storage Account
Gladinet isn’t just limited to one online storage account; you can add as many accounts as you need, including multiple accounts at the same service.  To add an account, browse to your networked drive (usually Z:\) and double-click the Click to mount [cloud storage]link.
image
Select the storage provider you wish to add from the drop-down list.  We’re going to add our Google Docs account, you could add an FTP account, Amazon S3, Windows Azure, or even a second Windows Live SkyDrive account.
image
Enter the account information for this account.  If you’re adding your Google Apps account, enter your email address and password.
sshot-2010-06-24-[14-55-04]
Now click Finish to setup the account, and Gladinet will automatically add this cloud storage account to your computer.
sshot-2010-06-24-[14-55-09]
If you haven’t used this storage service yet, you may be prompted to load the correct plugin.  Click Yes to continue.
image
After a few moments, your new cloud storage account will open in Explorer.  Here we have our Google Docs account open, and we can open and edit individual documents in Microsoft Office on our PC.  You can even add new documents to your Google Docs account, or organize your documents into folders.  This is a great way to quickly add new documents to Google Docs, or backup your existing documents.  We were able to add other files, including an .exe program to our Google Docs account, but remember that your Google Docs account only has 1Gb of free storage.
image
If you upload a document to a Google Docs account, you may be prompted that the file will be converted to Google Docs format.  You can click Yes to disable the conversion and upload the original file, or click No to proceed with the file conversion.
image
Here’s our new files in our Google Docs account.  Too bad you can’t edit the exe’s source code in the cloud!
image
Extra Gladinet Features
You can access extra Gladinet features from its tray icon.
image
One especially nice feature is the Task Manager, which lets you see the progress of current uploads and any errors that may have occurred with previous transfers.
sshot-2010-06-23-[14-42-03]
You can also access other Gladinet settings from the left sidebar, such as the amount of offline cache Gladinet will keep on your computer.  Note that most of the additional features are marked as Pro, so you won’t be able to use them with the standard free version.
sshot-2010-06-23-[14-44-49]
Conclusion
If you regularly use online file storage services, Gladinet can be an extremely useful tool to help you pull all of your storage options together and organize both your online and offline files the way you want.  This lets you quickly edit Office documents in SkyDrive or Google Docs in native desktop applications, or copy all of your important files to a secure online folder in a variety of services.  Accessing files and folders was often fairly slow, but this will depend on your internet connection.  Still, it was a much more convenient way to manage online storage than web-based interfaces.  It is also a great way to migrate files from one online storage service to another.  For instance, you could move your Google Docs to SkyDrive or vise versa, or even move all of your files to a secure Amazon S3 storage account.
Gladinet Starter Edition is free, and contains all the features we’ve covered here, while the Pro version costs $39 and offers encrypted, compressed, and mirrored folders in the cloud, as well as a cloud backup utility that can backup to multiple online storage locations at once.  Either which edition you choose,
Link
Download Gladinet Storage Starter Edition for free

Hoe kan ik in Windows 7 het interval van Herstelpunten aanpassen?

Bron: Computer!Totaal
Dennis Gandasoebrata24 jun. 2010 11:01
Interval herstelpunten aanpassen
Zorg bij een gedeelde computer voor goede back-ups. In geval van nood - bijvoorbeeld als een medegebruiker een ongewenste aanpassing doorvoert kunt u de situatie daarmee herstellen. Een prima ingebouwd hulpmiddel is Systeemherstel, dat uw computer in goede staat houdt. Bij problemen kunt u de computer terugzetten naar een punt in het verleden.
Daartoe maakt Systeemherstel meerdere herstelpunten aan. Dat doet het bijvoorbeeld bij belangrijke gebeurtenissen, zoals de installatie van een programma. Standaard wordt ook ieder etmaal een herstelpunt aangemaakt. Deze interval kunt u aanpassen via het register (Start, Uitvoeren en typ Regedit). Navigeer naar de sleutel HKEY_LOCAL_MACHINE\Software\Microsoft\Windows NT\CurrentVersion\SystemRestore. In het rechtervenster ziet u RPGLobalInterval. Dubbelklik erop en kies Decimaal. Geef hier het aantal seconden op waarna een herstelpunt moet worden gemaakt (in het vak Waardegegevens). Voor 48 uur typt u dus 172800 (48 x 60 x 60). Klik op OK.


Het ingebouwde Systeemherstel voldoet prima voor het maken van back-ups.

Minimize Windows Live Mail to the System Tray in Windows 7

Source: How-to Geek

Are you frustrated that you can not minimize Windows Live Mail to the system tray in Windows 7? With just a few tweaks you can make Live Mail minimize to the system tray just like in earlier versions of Windows.
Windows Live Mail in Windows Vist
In Windows Vista you could minimize Windows Live Mail to the system tray if desired using the context menu…Windows Live Mail in Windows 7
In Windows 7 you can minimize the app window but not hide it in the system tray. The Hide window when minimizedmenu entry is missing from the
How to Add the Context Menu Entry Back
Right click on the program shortcut(s) and select properties.
 
When the properties window opens click on the compatibility tab and enable the Run this program in compatibility mode for setting. Choose Windows Vista (Service Pack 2) from the drop-down menu and click OK.
 
Once you have restarted Windows Live Mail you will have access to the Hide window when minimized menu entry again.
 
And just like that your taskbar is clear again when Windows Live Mail is minimized.If you have wanted the ability to minimize Windows Live Mail to the system tray in Windows 7 then this little tweak will fix the problem.

Hoe kan ik in Windows 7 geluid en video afspelen?

Bron: PCM

woensdag 23 juni 2010 - Door: Xander Hoose


VLC media player
Het gratis en opensource VLC is één van de beste tools om muziek- en videobestanden af te spelen. De speler is inmiddels aan versie 1.1.0 aanbeland, na een uitgebreid bètatraject. De belangrijkste verbetering is hardwarematige ondersteuning voor videoacceleratie.
VLC ondersteunt het hardwarematig decoderen van (high definition-)videomateriaal op een compatibele grafische kaart. Dit werkt op dit moment alleen met nVidia-kaarten, ATI wordt nog niet ondersteund. Naast hardwareacceleratie ondersteunt VLC vanaf versie 1.1.0 nu ook Google's gloednieuwe WebM-videocodec. Shoutcast-gebruikers hebben half pech: het mooie overzicht van alle Shoutcast-zenders is verdwenen door een onenigheid tussen VLC en Shoutcast-eigenaar AOL. Het is uiteraard nog wel mogelijk Shoutcast-streams te beluisteren met VLC.
Download

Make Text and Images Easier to Read with the Windows 7 Magnifier


Source: How-to Geek

Do you have impaired vision or find it difficult to read small print on your computer screen? Today, we’ll take a closer look at how to magnify that hard to read content with the Magnifier in Windows 7.
Magnifier was available in previous versions of Windows, but the Windows 7 version comes with some notable improvements. There are now three screen modes in Magnifier. Full Screen and Lens mode, however, require Windows Aero to be enabled. If your computer doesn’t support Aero, or if you’re not using am Aero theme, Magnifier will only work in Docked mode.
Using Magnifier in Windows 7
You can find the Magnifier by going to Start > All Programs > Accessories > Ease of Access > Magnifier.
sshot-2
Alternately, you can type magnifier into the Search box in the Start Menu and hit Enter.
sshot-2010-06-12-[23-08-27]
On the Magnifier toolbar, choose your View mode by clicking Views and choosing from the available options. Clicking the plus (+) and minus (-) buttons will zoom in or zoom out.
sshot-6
You can change the zoom in/out percentage by adjusting the slider bar. You can also enable color inversion and select tracking options. Click OK when finished to save your settings.
sshot-14
After a brief period, the Magnifier Toolbar will switch to a magnifying glass icon. Simply click the magnifying glass to display the Magnifier Toolbar again.
sshot-16
Docked Mode
In Docked mode, a portion of the screen is magnified and docked at the top of the screen. The rest of your desktop will remain in it’s normal state. You can then control which area of the screen is magnified by moving your mouse.

Enable DreamScene in Any Version of Vista or Windows 7


Source: How-to Geek

Windows DreamScene was a utility available for Vista Ultimate that allowed users to set video as desktop wallpaper. It was dropped in Windows 7, but we’ll take a look at how to play DreamScenes in all versions of Windows 7 or Vista.
Downloading DreamScenes
First, you’ll need to find some DreamScenes to download. We’ve found some nice ones at both DreamScene.org and DeviantArt. You can find those download links at the end of the article. They’ll come as compressed files, so you’ll need to extract them after downloading.
sshot-38
Windows 7 DreamScene Activator
If you are running Windows 7 you can use Windows 7 DreamScene Activator. This free portable utility enables DreamScene in both 32 & 64 bit versions of Windows 7. Users can then set either MPG or WMV files as desktop wallpaper.
Download and extract the Windows 7 DreamScene Activator (link below). Once extracted, you’ll need to run the application as administrator. Right-click on the .exe and select Run as administrator.
sshot-29
Click on Enable DreamScene. This will also restart Windows Explorer if it is open.
sshot-30
To play your DreamScene, browse for the file in Windows Explorer, right-click the file and select Set as Desktop Background.
sshot-34
Enjoy your new Windows 7 DreamScene.
sshot-35
Although it says it is for Windows 7 only, we were able to get it to work with no problems on Vista Home Premium x32 as well.
sshot-2010-06-12-[18-51-27]
You can Pause the DreamScene at anytime by right-clicking on the desktop and selecting Pause DreamScene.
sshot-32
When you are ready for a change, click Disable DreamScene and switch back to your previous wallpaper.
sshot-36
Using VLC Media Player
Users of all versions of Windows 7 and Vista can enable a DreamScene using VLC. Recently, we showed you how to set a video as your desktop wallpaper in VLC.  Since DreamScenes are in MPEG or WMV format, we will use the same tactic to display them as desktop wallpaper. We’ll just need to make a few additional tweaks to the VLC settings.
You’ll need to download and install VLC media player if you don’t already have it. You can find the download link below. Next, select Tools and Preferences from the Menu.
sshot-10
Select the Video button on the left and then choose DirectX video output from the Output dropdown list.
sshot-16
Next, select All under Show Settings at the lower left, then select the Video button on the left pane. Uncheck Show media title on video. This will prevent VLC from constantly showing the title of the video on the screen each time the video loops. Click Save and the restart VLC.
sshot-17
Now we will add the video to our playlist and set it to continuously loop. Select View and Playlist from the Menu.
sshot-5
Select the Add file button from the bottom of the Playlist window and select Add file.
sshot-19
Browse for your file and click Open.
sshot-22
Click the Loop button at the bottom so the video plays in a continuous loop.
sshot-23
Now, we’re ready to play the video. After the video starts playing, select Video and DirectX Wallpaper from the Menu, then minimize VLC.
sshot-25 copy
If you’re using Aero Themes, you may get a pop-up warning and Windows will switch automatically to a basic theme.
sshot-17
If looping one video gets to be a little repetitive, you can add multiple videos to your playlist in VLC and loop the entire playlist. Just make sure you toggle the Loop button on the playlist window to Loop All.
sshot-24
Now you’ve got a nice DreamScene playing on your desktop. Another cool trick you can do with VLC is take snapshots of favorite movie scenes and set them as backgrounds.
When you’re ready to go back to your old wallpaper, maximize VLC, select Video and click DirectX Wallpaper again to turn it off the video background. Occasionally we were left with a black screen and had to manually change our wallpaper back to normal even after turning off the DirectX Wallpaper.
sshot-27
Note: Keep in mind that using the VLC method takes up a lot of resources so if you try to run it on older hardware, or say a netbook, you’re not going to get good results. We also tried to use the VLC method in XP, but couldn’t get it to work.
DreamScenes from Dreamscene.org
DreamScenes from DeviantArt
Download VLC media player
Windows 7 DreamScene Activator